
How to Screen Record on iPhone 11: A Comprehensive Guide
Screen recording on your iPhone 11 is a fantastic feature that allows you to capture everything on your screen, from gameplay to tutorials. Whether you want to share your skills with others or simply document your screen activities, this guide will walk you through the process step by step.
Accessing the Screen Recording Feature
Before you start recording, you need to ensure that the screen recording feature is enabled on your iPhone 11. Here’s how to do it:

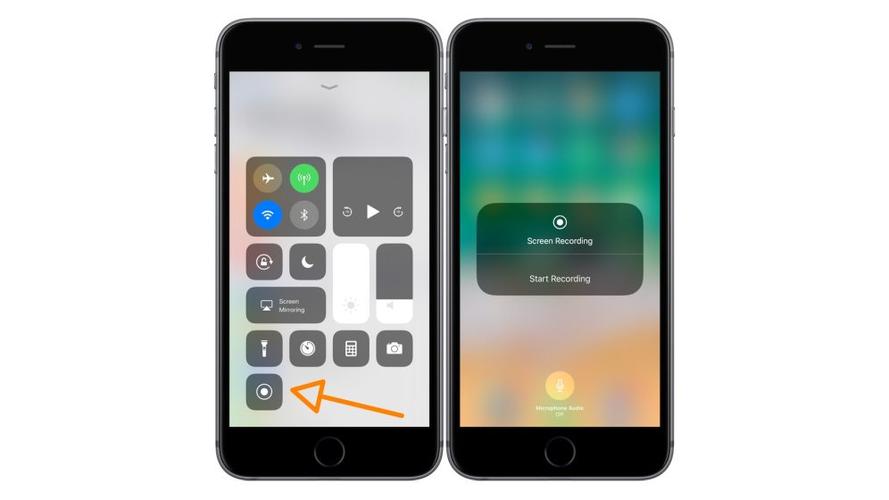
- Swipe down from the top-right corner of your screen to access the Control Center.
- Long press on the “Screen Recording” button, which looks like a circle with a dot inside.
- Drag the “Screen Recording” button to the top of the Control Center for quick access.
Once you’ve added the screen recording button to your Control Center, you’re ready to start recording.
Starting a Screen Recording
Now that you have the screen recording feature enabled, here’s how to start recording:
- Open the app or screen you want to record.
- Tap and hold the “Screen Recording” button in the Control Center.
- A countdown will appear, and the recording will begin after three seconds.
During the recording, you can use the on-screen controls to pause, resume, or stop the recording. To pause the recording, tap the screen and select “Pause.” To resume, tap the screen and select “Resume.” To stop the recording, tap the screen and select “Stop.” The recording will save to your iPhone’s Photos app.
Customizing Your Screen Recording
iPhone 11 allows you to customize your screen recording with various options. Here’s how to access and use these options:
- After starting the screen recording, tap the screen to bring up the on-screen controls.
- Tap the gear icon to access the recording settings.
Here are the customization options available:
- Microphone: You can choose to record audio from the device’s microphone, the connected headphones, or both.
- Zoom: Enable zoom to record a specific area of the screen.
- Loop Recording: Keep the recording going indefinitely until you manually stop it.
- Mirror Screen: Mirror your screen to record what’s happening on your iPhone’s display.
Experiment with these options to find the best settings for your screen recording needs.
Editing Your Screen Recording
After you’ve finished recording, you can edit your video to remove unwanted parts or add text, music, or other effects. Here’s how to edit your screen recording:
- Open the Photos app and navigate to the “Recents” album.
- Tap the screen recording you want to edit.
- Tap the “Edit” button in the upper-right corner.
Photos offers various editing tools, including:
- Cut: Trim the beginning and end of your recording.
- Filters: Apply filters to change the look and feel of your video.
- Text: Add text to your video.
- Music: Add background music to your recording.
Once you’re satisfied with your edits, tap “Done” to save your changes.
Sharing Your Screen Recording
After you’ve recorded and edited your video, you can share it with others. Here’s how to share your screen recording:
- Open the Photos app and navigate to the “Recents” album.
- Tap the screen recording you want to share.
- Tap the “Share” button in the lower-left corner.
From here, you can choose to share your recording via various methods, such as:
- Messages: Send the recording as a message to friends or family.
- Mail: Attach the recording to an email.
- Facebook: Post the

